Peanut Butter Cookies
This is the peanut butter cookie my Mom and Grandma used to make. It's still one of my favorite cookies. When these sweet, salty morsels of happiness come out of the oven, they are just as good today as they were when I was a kid. The recipe originally appeared on the Skippy peanut butter label in the early 1950's. It produces cookies that are golden brown with wonderful flavor and a light crispiness that melts in your mouth. Basically, it's everything you would expect a good peanut butter cookie to be.
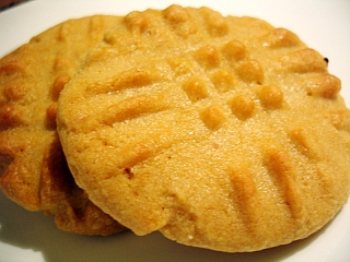
This is the peanut butter cookie my Mom and Grandma used to make. It's still one of my favorite cookies. When these sweet, salty morsels of happiness come out of the oven, they are just as good today as they were when I was a kid. The recipe originally appeared on the Skippy peanut butter label in the early 1950's. It produces cookies that are golden brown with wonderful flavor and a light crispiness that melts in your mouth. Basically, it's everything you would expect a good peanut butter cookie to be.
- 1 teaspoon baking soda
- 1/2 teaspoon salt
- 1 teaspoon vanilla extract
- 2 1/2 cups all-purpose flour
- 1 teaspoon baking powder
- 1 cup unsalted butter softened (or, 1/2 cup butter and 1/2 cup shortening)
- 1 1/3 cups granulated sugar divided
- 1 cup light brown sugar firmly packed
- 1 cup creamy or chunky peanut butter (i use jif)
- 2 large eggs beaten
- Carbohydrate 161.230646666666 g
- Cholesterol 520.61 mg
- Fat 69.763374 g
- Fiber 5.43234002982974 g
- Protein 30.046914 g
- Saturated Fat 30.142574 g
- Serving Size 1 1 Dozen (361g)
- Sodium 1493.6832 mg
- Sugar 155.798306636837 g
- Trans Fat 5.56595440000002 g
- Calories 1359 calories
Step-by-step
- Place oven rack in middle position and preheat oven to 375 degrees F. Line two non-insulated cookie sheets or sheet pans with either parchment paper or silicon baking pads (e.g., Silpad), if desired (*see note). Set aside.
- In a mixing bowl, sift together the flour, baking powder, baking soda and salt. Set aside.
- In bowl of standing mixer fitted with paddle attachment (or an electric mixer, or by hand), beat butter at medium-high speed until creamy. Add brown sugar and 1 cup of the granulated sugar and beat until light and fluffy, about 3 minutes (or 5 to 6 minutes by hand), stopping to scrape down bowl as necessary. Reduce speed to medium-low and add in peanut butter, beating until fully incorporated, then add eggs, one at a time, beating well after each addition until they are well incorporated; beat in vanilla extract. Reduce speed to lowest setting or gently stir by hand; gradually add in the sifted dry ingredients, scraping sides of mixing bowl as necessary, and beating just until it's incorporated; don't overmix or the cookies will be tough. (The dough should be stiff and slightly sticky -- not dry.)
- At this point, for a soft and chewy cookie, the dough should be double wrapped in plastic and refrigerated for 1 to 3 hours. (The dough can keep in the refrigerator for a couple days or stored in the freezer for up to 1 month.) For a thinner and crisper cookie, use dough immediately without chilling.
- Shape dough into 1- to 1 1/4-inch sized balls, and roll in remaining 1/3 cup granulated sugar, if desired. (Make them all the same size per baking pan so they bake evenly. A #40 cookie scoop is the perfect size.) Place balls 2-inches apart, in staggered rows (**see note) of 3-2-3-2-3, on prepared baking sheets or regular ungreased pans. Gently press and flatten each dough ball with back of fork dipped in cold water, making a criss-cross design to tops.
- For a light, crisp cookie: Place one cookie sheet at a time onto center rack of a preheated 375 degree F oven and bake until just starting to turn golden, about 9 to 10 minutes, rotating baking sheet if needed for even baking. Do not over-bake! (You want the tops to just start taking on color, and still have slightly puffy and moist centers. When removed from the oven, they will flatten out and continue cooking through.) Remove cookie sheet from oven and allow cookies to cool and set for 1 to 2 minutes on baking sheet, then transfer to wire racks to cool completely. If baked on parchment paper or silicon baking pad, slide the entire sheet off the tray directly onto the cooling racks. Meanwhile, you can re-use the cookie sheet immediately for baking the next batch.
- For a soft, chewy cookie: Refrigerate the dough for 1 to 3 hours. Once chilled, form balls and flatten with a fork as before. Then, refrigerate uncooked cookies on baking sheet for at least 15 minutes to firm dough back up. Place one cookie sheet at a time onto center rack of a preheated 325 degree F oven and bake until cookies are puffed and just slightly golden along edges, about 15 minutes, rotating baking sheet if needed for even baking. Do not over-bake! Remove cookie sheet from oven and allow cookies to cool and set for 1 to 2 minutes on baking sheet, then transfer to wire racks to cool completely. If baked on parchment paper or silicon baking pad, slide the entire sheet off the tray directly onto the cooling racks. Meanwhile, you can re-use the cookie sheet immediately for baking the next batch.
- Store cookies in an airtight container at room temperature for up to 1 week.
Swapping half of the unsalted butter for vegetable shortening alters the moisture content and melting point of the fat, resulting in a taller cookie that spreads less across the baking sheet. Fat selection dictates structural integrity in classic drop cookies. Butter contains water that evaporates during baking to create steam, whereas 100 percent fat shortening traps air pockets more efficiently without releasing water vapor. Understanding this ratio shifts the final outcome from a delicate, shattering crunch to a sturdy, tender bite.
Controlling Crispness Versus Chewiness
Achieving a specific mouthfeel requires manipulating temperature at multiple stages of preparation. Chilling the dough for one to three hours solidifies the fats, which slows down the rate at which the cookies spread in the heat of the oven. For a crispier edge and a caramelized perimeter, unchilled dough baked at 375 degrees Fahrenheit provides rapid initial expansion. Conversely, dropping the oven temperature to 325 degrees Fahrenheit for chilled dough allows the center to set into a soft, puffed interior before the exterior browns too quickly. Dipping a fork in cold water before pressing the traditional criss-cross pattern prevents the tines from tearing the sticky dough and flattening the structure prematurely.
- Overmixing the all-purpose flour after it joins the wet ingredients develops gluten networks, yielding tough cookies instead of tender ones.
- Using a #40 cookie scoop guarantees uniform sizing, which ensures every piece finishes baking within the 9 to 15 minute window.
- Allowing the baked batch to rest on the hot pan for one to two minutes completes the internal set before transfer to a wire rack.


